California Slate Company, Inc.

Architectural Specifications
ARCAT Slate Specifications
![]() ARCAT.com is the most widely used building product information website and contains an up-to-date library of our slate specifications in a variety of formats.
ARCAT.com is the most widely used building product information website and contains an up-to-date library of our slate specifications in a variety of formats.
Slate Shingle Specifications
![]() California Slate is a proud member of the Slate Roofing Contractors Association of North America, Inc. (SRCA) which publishes “Section 07310 — Slate Shingles” setting forth architectural specifications for a slate roofing project. The following in this section is adapted by SRCA from that document, based on California Slate Company products.1
California Slate is a proud member of the Slate Roofing Contractors Association of North America, Inc. (SRCA) which publishes “Section 07310 — Slate Shingles” setting forth architectural specifications for a slate roofing project. The following in this section is adapted by SRCA from that document, based on California Slate Company products.1


Part 1 General
-
1.1
Section Includes
2
- Slate shingles.
- Underlayment.
- Section 06 10 00 - Rough Carpentry.
- Roofing Terminology: ASTM D 1079 and glossary in NRCA’s “The NRCA Roofing and Waterproofing Manual” for definitions of terms related to roofing work in this Section.
-
ASTM International (ASTM):
- ASTM B 749 - Standard Specification for Lead and Lead Alloy Strip, Sheet, and Plate Products.
- ASTM C 406 - Standard Specification for Roofing Slate.
- ASTM D 226 - Standard Specification for Asphalt-Saturated Organic Felt Used in Roofing and Waterproofing.
- ASTM D 1079 - Standard Terminology Relating to Roofing and Waterproofing.
- ASTM E 84 - Standard Test Method for Surface Burning Characteristics of Building Materials.
- ASTM F 1667 - Standard Specification for Driven Fasteners: Nails, Spikes, and Staples.
- Submit under provisions of Section 01 30 00 - Administrative Requirements.
-
Product Data:
Manufacturer’s data sheets on each product to be used, including:
- Preparation instructions and recommendations.
- Storage and handling requirements and recommendations.
- Installation methods.
-
Selection Samples:
5
Of each color, size, texture, and shape.
- Include similar Samples of trim and accessories involving color selection.
-
Verification Samples:
For the following products, of sizes indicated, to verify color selected:
- Slate Shingle: Full size, of each color, size, texture, and shape.
- Fasteners: Three fasteners of each type, length, and finish.
- Material Test Reports: Based on evaluation of comprehensive tests performed by a qualified testing agency, for each slate variety.
- Warranty: Sample of special warranty.
- Installer Qualifications: Minimum 2 year experience installing similar products.
- Source Limitations: Obtain each color of slate shingle from single quarry capable of producing slate of consistent quality in appearance and physical properties.
-
Mockups:
6
Build mockups to verify selections made under sample submittals and to demonstrate aesthetic effects and set quality standards for materials and execution.
-
Build mockups for slate shingles including related roofing materials.
- Size: Minimum of 48 inches long by 48 inches (1219 mm × 1219 mm) wide.
- Approval of mockups does not constitute approval of deviations from the Contract Documents contained in mockups unless Architect specifically approves such deviations in writing.
- Approved mockups may become part of the completed Work if undisturbed at time of Substantial Completion.
-
Build mockups for slate shingles including related roofing materials.
- Convene minimum two weeks prior to starting work of this section.
-
Store underlayment rolls on end, on pallets or other raised surfaces. Do not double stack rolls.
- Handle, store, and place roofing materials in a manner to avoid significant or permanent damage to roof deck or structural supporting members.
- Protect unused underlayment from weather, sunlight, and moisture when left overnight or when roofing work is not in progress.
- Store slates on edge, and on pallets.
- Maintain environmental conditions (temperature, humidity, and ventilation) within limits recommended by manufacturer for optimum results. Do not install products under environmental conditions outside manufacturer’s recommended limits.
- Ensure that products of this section are supplied to affected trades in time to prevent interruption of construction progress.
-
Special Warranty:
Standard form in which roofing Installer agrees to repair or replace slate roofing that fails in materials or workmanship within specified warranty period.
- Warranty Period: Two years from date of Substantial Completion.
-
Furnish extra materials that match products installed and that are packaged with protective covering for storage and identified with labels describing contents.
- Slate Shingles: 2% of total roof area installed, including each type and color, stacked on edge.
Part 2 Products
-
2.1
Manufacturers
- Acceptable Manufacturer: California Slate Company, Inc., which is located at: 3344 Market Street, San Francisco, CA 94114; Tel: (888) 994-0842; Email: request info (info@CaliforniaSlateCompany.com); Web: californiaslatecompany.com
- Web: https://californiaslatecompany.com.
- Substitutions: Not permitted. 7
- Requests for substitutions will be considered in accordance with provisions of Section 01 60 00 - Product Requirements.
-
Slate Shingles:
ASTM C 406, Grade S1; hard, dense, and sound; chamfered edges, with nail holes machine punched for slates 3/8 inch (9.5 mm) or less in thickness, slates thicker than 1/2 inch (13 mm) may be drilled and countersunk.
- No broken or cracked slates, no broken exposed corners, and no broken corners on covered ends that could sacrifice nailing strength or laying of a watertight roof.
- No pyrite inclusions in slates.
- No carbon-bearing bands or soft or weak ribbons in slates.
- No knots or knurls or cramps in slates that would produce humps in the roof.
- Nail holes are to be positioned no more than 1.5 inches (38 mm) in from the side edges of the slate.
- Nail holes shall be positioned approximately 2/3 the distance from the bottom of the slate when using standard 3 inches (152 mm) headlap. The top of the underlying slate shall not be penetrated by the slating nails.
- The holes punched in the slates shall be the correct diameter to provide a snug fit for the shank of the roofing nails.
-
Starter Slate:
Slate shingles with chamfered nail holes front-side punched.
- Length: Exposure of slate shingle plus head lap.
-
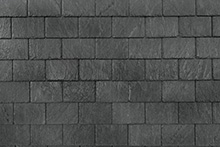
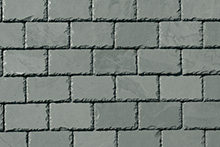
Del Castillo Gray Slate:
8
- Size: 16 inches × 10 inches (406 mm × 254 mm) and 16 inches × 8 inches (406 mm × 203 mm).
- Thickness: Lightweight: 3/16 inch (5 mm); Standard: 1/4 inch (7 mm), Heavy: 1/2 inch (12 mm).
- Weight: 600 to 1,200 lbs/sq. (0.272 metric ton to 0.544 metric ton/sq.)
- Provenance: Spain.
- Surface Texture: Lightly textured.
- Nail Holes: Minimum two per shingle.
- Color: Medium gray slate with just a vague hue of silver or blue.
- Weather-Exposure Color Change: Unfading and non-weathering. Extreme or high alpine conditions.
-
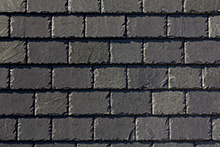
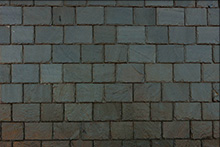
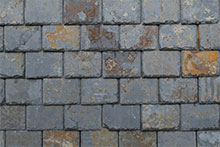
Buckingham Gray Black Slate:
9
- Size: 16 inches × 10 inches (406 mm × 254 mm) and 16 inches × 8 inches (406 mm × 203 mm).
- Thickness: 1/4 inch to 3/4 inch (7 mm to 19 mm) (standard between 3/16 inch to and 1/2 inch (9.5 mm and 13 mm) and heavy between ½” and ¾”).
- Weight: 900 to 2,400 lbs/sq; 3/16” 900 lbs/sq, 3/8” 1,100 lbs/sq, ½” 1,600 lbs/sq, ¾” 2,400 lbs/sq
- Provenance: Virginia
- Surface Texture: Fine, smooth texture.
- Nail Holes: Minimum two per shingle.
- Color: Gray black with a hint of blue with mica or phyllitic sheen or lustre.
- Weather-Exposure Color Change: Unfading.
-
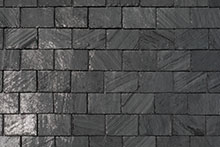
True Black Galcar Slate:
10
- Size: 16 inches × 10 inches (406 mm × 254 mm) and 16 inches × 8 inches (406 mm × 203 mm).
- Thickness: 3/16 inch to 1/2 inch (5 mm to 12 mm).
- Weight: 600 to 1,200 lbs/sq. (0.272 metric ton to 0.544 metric ton/sq.).
- Provenance: Spain.
- Surface Texture: Highly textured.
- Nail Holes: Minimum two per shingle.
- Color: Black
- Weather-Exposure Color Change: Unfading.
-
True Black Hebra Slate:
11
- Size: 16 inches × 10 inches (406 mm × 254 mm) and 16 inches × 8 inches (406 mm × 203 mm).
- Thickness: 1/4 inch to 1/2 inch (7 mm to 12 mm).
- Weight: 800 to 1,200 lbs/sq. (0.363 metric ton to 0.544 metric ton/sq.)
- Provenance: Spain.
- Surface Texture: Smoother and finer in texture than True Black Galcar.
- Nail Holes: Minimum two per shingle.
- Color: Black
- Weather-Exposure Color Change: Unfading.
-
Lugo Green Slate:
12
- Size: 16 inches × 10 inches (406 mm × 254 mm) and 16 inches × 8 inches (406 mm × 203 mm).
- Thickness: 3/16 inch to 3/8 inch (5 mm to 10 mm).
- Weight: 600 to 1,000 lbs/sq. (0.272 metric ton to 0.454 metric ton/sq.).
- Provenance: Spain.
- Surface Texture: Smooth, even texture.
- Nail Holes: Minimum two per shingle.
- Color: Green background and flecks of lighter gray green throughout.
- Weather-Exposure Color Change: Unfading.
-
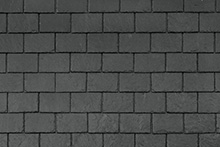
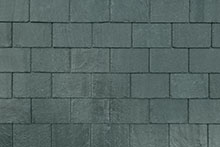
Vermont Strata Gray Slate:
13
- Size: 18 inches × 12 inches (457 mm x356 mm) to 12 inches × 8 inches (305 mm × 203 mm).
- Thickness: 1/4 inch (6 mm).
- Weight: 800 lbs/sq. (0.363 metric ton/sq.)
- Provenance: Vermont.
- Surface Texture: Smooth, even texture.
- Nail Holes: Minimum two per shingle.
- Color: Medium gray color taking on buff or brown tones over time.
- Weather-Exposure Color Change: Fading.
-
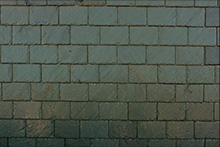
Gray Green (Semi-Weathering) Slate:
14
- Size: 18 inches × 12 inches (457 mm x356 mm) to 12 inches × 8 inches (305 mm × 203 mm).
- Thickness: 1/4 inch (6 mm).
- Weight: 850 lbs/sq.
- Provenance: Vermont.
- Surface Texture: Medium-smooth texture.
- Nail Holes: Minimum two per shingle.
- Color: Tones vary from medium grey to light green developing the tones of brown, pink, and buff over time.
- Weather-Exposure Color Change: Fading.
-
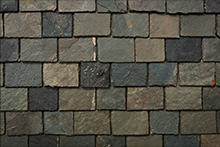
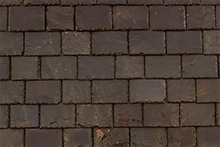
Brazilian Charcoal Slate:
15
- Size: 16 inches × 10 inches (406 mm × 254 mm) and 16 inches × 8 inches (406 mm × 203 mm).
- Thickness: 3/16 inch to 1/2 inch (4.8 mm to 13 mm) (“standard” between 3/16 inch and 1/4 inch (4.8 mm and 6 mm)); “heavy” between 1/4 inch and 1/2 inch (6 mm and 13 mm)).
- Weight: 650 to 1,000 lbs/sq. (0.295 metric ton to 0.454 metric ton/sq.).
- Provenance: Brazil.
- Surface Texture: Medium-smooth texture.
- Nail Holes: Minimum two per shingle.
- Color: Dark gray background with shades of pure black in individual slates.
- Weather-Exposure Color Change: Unfading.
-
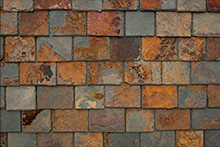
Brazilian Multi-Color Slate:
16
- Size: 16 inches × 10 inches (406 mm × 254 mm) and 16 inches × 8 inches (406 mm × 203 mm).
- Thickness: 1/4 inch to 3/8 inch (7 mm to 10 mm).
- Weight: 900 lbs/sq. (0.408 metric ton/sq.).
- Provenance: Brazil.
- Surface Texture: Medium-smooth texture.
- Nail Holes: Minimum two per shingle.
- Color: Light gray background coupled with approximately 40-50% of multi-color tiles which have a very vivid color range from orange to red with hints of green.
- Weather-Exposure Color Change: Unfading.
- The Slate Shield method uses half as many pieces as a traditionally installed slate roof, and so weighs in at 400 to 500 lbs./sq. (0.181 metric ton to 0.227 metric ton/sq.) while giving the appearance of a “standard weight” Vermont or Spanish slate roof.
- Size: 12 inches × 10 inches (305 mm × 254 mm) slate tiles Only the hip, ridge, and valley tiles are nailed.
- Felt Underlayment: ASTM D 226, Type II, asphalt-saturated organic felt, unperforated.
-
Slating Nails:
ASTM F 1667, copper or stainless-steel, smooth shanked, wire nails; 0.135 inch (3.5 mm) minimum thickness; sharp pointed; with 3/8-inch (9.5 mm) minimum diameter flat head; of sufficient length to penetrate a minimum of 3/4 inch (19 mm) into sheathing.
- Where nails are in contact with metal flashing, use nails made from same metal as flashing.
- Felt Underlayment Nails: Stainless-steel, or hot-dip galvanized-steel wire nails with low-profile capped heads or disc caps, 1-inch (25 mm) minimum diameter.
- Wood Nailer Strips and Eave Cants: Comply with requirements in Section 06 10 00 - Rough Carpentry0 - Rough Carpentry.
-
General:
Comply with requirements in Section 07 62 00 - Sheet Metal Flashing and Trim.
- Sheet Metal: minimum16 oz. (20 oz recommended) Copper or minimum 28 gauge Stainless steel.
- Fabricate sheet metal flashing and trim to comply with recommendations that apply to design, dimensions, metal, and other characteristics of the item in SMACNA’s “Architectural Sheet Metal Manual” and “Copper and Common Sense” by Revere Copper Products
- Vent-Pipe Flashings: Provide minimum 16 oz. copper or lead (ASTM B 749, Type L51121, at least 1/16 inch (1.6 mm) thick) sleeve sized to slip over and turn down into pipe, soldered to skirt at slope of roof and extending at least 4 inches (102 mm) from pipe onto roof.
Part 3 Execution
-
3.1
Examination
-
Examine substrates, areas, and conditions, with Installer present, for compliance with requirements for installation tolerances and other conditions affecting performance of the Work.
- Examine roof sheathing to verify that sheathing joints are supported by framing and blocking and that installation is within flatness tolerances.
- Verify that substrate is sound, dry, smooth, clean, sloped for drainage, and completely anchored and that provision has been made for flashings and penetrations through roofing.
- Proceed with installation only after unsatisfactory conditions have been corrected.
- General: Comply with underlayment manufacturer’s written installation instructions applicable to products and applications indicated unless more stringent requirements apply.
-
Double-Layer Felt Underlayment:
Install on roof deck parallel with and starting at the eaves. Install a 19-inch- (483 mm) wide starter course at eaves and completely cover with full-width second course. Install succeeding courses lapping previous courses 19 inches (483 mm) in shingle fashion. Lap ends a minimum of 6 inches (152 mm). Stagger end laps between succeeding courses at least 72 inches (1829 mm). Fasten with felt underlayment nails.
- Terminate felt underlayment extended up not less than 4 inches (102 mm) against sidewalls, curbs, chimneys, and other roof projections.
-
Metal-Flashed, Open-Valley Underlayment:
Install two layers of 36-inches (914 mm) wide felt underlayment centered in valley. Stagger end laps between layers at least 72 inches (1829 mm). Lap ends of each layer at least 12 inches (305 mm) in direction to shed water. Fasten each layer to roof deck with felt underlayment nails.
- Lap roof-deck felt underlayment over first layer of valley felt underlayment at least 6 inches (152 mm).
- General: Install metal flashings and other sheet metal to comply with requirements in Section 07 62 00 - Sheet Metal Flashing and Trim.
- Apron Flashings: Extend lower flange over and beyond each side of downslope slate shingles and up the vertical surface.
- Step Flashings: Install with a head lap of 3 inches (76 mm) and extend both horizontally and vertically. Install with lower edge of flashing just upslope of, and concealed by, butt of overlying slate shingle. Fasten to roof deck only.
- Cricket Flashings: Install against the roof-penetrating element, extending concealed flange beneath upslope slate shingles and beyond each side.
- Hip Flashings: Install centrally over hip with lower edge of flashing concealed by butt of overlying slate shingle. Fasten to roof deck.
-
Valley Flashings:
Install centrally in valleys, lapping ends at least 8 inches in direction to shed water. Fasten upper end of each length to roof deck beneath overlap.
- Nail valley flashings within 3/4 inch (19 mm) of the edge of the flashing.
- If valleys are soldered, cleating is preferred to nailing.
- Pipe Flashings: Form flashing around pipe penetrations and slate shingles. Fasten to roof deck.
-
General:
Beginning at eaves, install slate shingles according to the SRCA’s written installation guidelines and as follows:
- Install wood cant strip or metal drip edge with integral cant at eave edges.
- Install shingle starter course chamfered face down.
-
Install first and succeeding shingle courses with chamfered face up. Begin installation with full-width first course end slate at rake edge.
- Offset joints of uniform-width slate shingles by half the shingle width in succeeding courses.
- Offset joints of random-width slate shingles a minimum of 3 inches (76 mm) in succeeding courses.
- Maintain a 3-inches (76 mm) minimum head lap between succeeding shingle courses.
- Maintain uniform exposure of shingle courses between eaves and ridge.
- Extend shingle starter course and first course minimum 1.5 inches (38 mm) over fascia at eaves.
- Extend shingle starter course and succeeding courses 1 inch over fascia at rakes.
- Cut and fit slate neatly around roof vents, pipes, ventilators, and other projections through roof.
- Hang each slate with two slating nails for each shingle with nail heads lightly touching slate. Do not drive nails home drawing slates downward or leave nail head protruding enough to interfere with overlapping shingle above.
- Metal Ridge: Install metal ridge with fasteners of same metal as ridge, fastened through keyways in slate, or with cleats and blind fasteners.
- Overlap metal ridge sections minimum 4 inches (102 mm) at ends.
-
Ridges:
Install ridge slate in saddle configuration.
- Install and anchor wood nailer strips of thicknesses to match abutting courses of slate shingles, terminating nailer strip 1 inch from the eave.
- Anchor ridge slate to supporting wood nailer strip with three nails for each slate shingle without nails penetrating underlying slate.
-
Hips:
17
- Install and anchor slate hips in saddle configuration.
- Install and anchor slate hips in mitered configuration.
- Install and anchor slate hips in fantail configuration.
- Install and anchor wood nailer strips of thickness to match abutting courses of slate shingles. Anchor hip slate to nailer strip with three nails located in upper third of hip-slate length.
- Notch starter shingle and first shingle course at hip to fit around nailer strips so no wood is exposed at ridge eave.
-
Open Valleys:
Cut slate shingles to form straight lines at open valleys. Maintain uniform width of exposed open valley from highest to lowest point.
- Do not nail shingles to valley metal flashings.
-
Closed Valleys:
Cut slate shingles to form straight lines at closed valleys.
- Do not nail shingles to valley metal flashings.
- Remove and replace damaged or broken slate shingles.
- Remove excess slate and debris from Project site.
-
Examine substrates, areas, and conditions, with Installer present, for compliance with requirements for installation tolerances and other conditions affecting performance of the Work.
-
California Slate Company, Inc.; natural slate roofing material.
This section is based on the products of California Slate Company, Inc., which is located at:
3344 Market Street
San Francisco, CA 94114
Tel: (888) 994-0842
Email: request info (info@CaliforniaSlateCompany.com)
Web: californiaslatecompany.com
California Slate Company is the premier resource for natural slate roofing material in the United States. With more than 20 years’ experience in the industry, we have long-standing relationships with the top quarries around the world and pride ourselves on choosing only the best natural slate available. Our specific products—many exclusive to us—are selected for their durability and unique colors and characteristics. The dependability of our products is a key component of our mission.
Located in the San Francisco Bay Area, California Slate Company serves projects throughout the West Coast, including Los Angeles, Portland, and Seattle. We also ship slate to any location, and will gladly send you a full-size sample of any slate in stock. Natural slate is an environmentally friendly product that will last for generations. Slate is not only waterproof, but fireproof—an important consideration when choosing a roofing material.
We look forward to working with you on your next project and helping you select a strikingly beautiful, long-lasting slate that’s ideal for your needs.
-
Delete items below not required for project. ↩
-
Delete any sections below not relevant to this project; add others as required. ↩
-
Delete references from the list below that are not actually required by the text of the edited section. ↩
-
Delete selection samples if colors have already been selected. ↩
-
Include a mock-up if the project size and/or quality warrant taking such a precaution. The following is one example of how a mock-up on a large project might be specified. When deciding on the extent of the mock-up, consider all the major different types of work on the project. ↩
-
Delete either this paragraph or the following paragraph; coordinate with requirements of Division 1 section on product options and substitutions. ↩
-
A California Slate Company exclusive. Truly non-fading and non-weathering, Del Castillo Gray is difficult to find — we are the only U.S. company to carry it. It is a medium gray slate, lightly textured with just a vague hue of silver or blue. Unparalleled durability puts this remarkable slate in a class of its own. It will maintain its original look for generations. The standard size is listed below. Please contact us for other sizes available. Delete this paragraph if this type of slate is not required. ↩
-
A California Slate Company exclusive in the Western states. Buckingham’s blue-gray-black slate graces historical and modern buildings across the nation. Coming from their quarry in Virginia, Buckingham Slate has been producing slate since 1867. Buckingham Slate is recognized as the best in the industry and has the highest ratings possible. It is guaranteed to last for generations. Its durability, strength, and historical significance have made it an American classic for centuries. Delete this paragraph if this type of slate is not required. ↩
-
This highly textured slate is quarried in La Baña, Spain. There is extensive variation in this material and the overall esthetic is rustic rather than uniform. It reflects light very evenly and provides a classic, Spanish-style slate look. The standard size is listed below. Please contact us for other sizes available. Delete this paragraph if this type of slate is not required. ↩
-
True Black Hebra is quarried in La Baña, situated in the León region of Spain. It is smoother and finer in texture than True Black Galcar, and its strong vertical grain reflects light differently, resulting in a quite dissimilar appearance on a roof. Overall, it has a very refined look. True Black Hebra is slightly darker than True Black Galcar but its other qualities are fairly similar. Its test results are excellent and it is easy to work with (no need for power tools). Alpine conditions pose no problems for it. The standard size is listed below. Please contact us for other sizes available. Delete this paragraph if this type of slate is not required. ↩
-
Quarried near Lugo in northwestern Spain, Lugo Green is a refined slate with a green background and flecks of lighter gray green throughout. It has a smooth, even texture and carries the distinction of being one of the only colored slates from Spain. It is unfading which means it will retain its original appearance throughout its lifetime. Lugo Green Slate offers a sophisticated look that suits both classic and modern buildings. It can be used where a lightweight application is required. The standard size is listed below. Please contact us for other sizes available. Delete this paragraph if this type of slate is not required. ↩
-
Vermont Strata Gray Slate starts off with an even, medium gray color. When exposed to the elements over time, a certain percentage of the slates (perhaps 20%-40%) will change color, taking on buff or brown tones. The standard size is listed below. Please contact us for other sizes available. Delete this paragraph if this type of slate is not required. ↩
-
Gray Green (Semi-Weathering) Slate is the quintessential Vermont slate. Quarried since the middle of the 19th century, it defines the industry in Vermont more than any other. The tones vary from medium grey to light green. It is of medium-smooth texture. The standard size is listed below. Please contact us for other sizes available. Delete this paragraph if this type of slate is not required. ↩
-
A very hard, very uniform slate, Brazilian Charcoal Slate has a dark gray background with shades of pure black in individual slates. It creates a very pleasing effect when installed. Brazil is a relative newcomer to the slate industry, yet one of the most technologically advanced, resulting in extremely high quality control and a slate that is one of the most consistent in the business. The standard size is listed below. Please contact us for other sizes available. Delete this paragraph if this type of slate is not required. ↩
-
Brazilian Multi-Color is a slate with a light gray background coupled with approximately 40-50% of multi-color tiles which have a very vivid color range from orange to red with hints of green. The color appears more fossil-like than solid and the result is a rich tapestry with a very distinctive look. The slate comes only in 7-10 mm (no lightweight versions) and is chunky but still manages to have a reasonably smooth face. The standard size is listed below. Please contact us for other sizes available. Delete this paragraph if this type of slate is not required. ↩
-
Delete hips configurations not required. ↩
Class A Roofing Material by Statute
![]() The State of California, by statute, has defined slate to be a Class A roofing material. This includes roof assemblies which install slate over combustible decks covered with a fire-resistant underlayment.
The State of California, by statute, has defined slate to be a Class A roofing material. This includes roof assemblies which install slate over combustible decks covered with a fire-resistant underlayment.
California Building Code §1505.2 Class A roof assemblies
Class A roof assemblies are those that are effective against severe fire test exposure. Class A roof assemblies and roof coverings shall be listed and identified as Class A by an approved testing agency. Class A roof assemblies shall be permitted for use in buildings or structures of all types of construction.
Exceptions:
- Class A roof assemblies include those with coverings of brick, masonry or an exposed concrete roof deck.
- Class A roof assemblies also include ferrous or copper shingles or sheets, metal sheets and shingles, clay or concrete roof tile or slate installed on noncombustible decks or ferrous, copper or metal sheets installed without a roof deck on noncombustible framing.
- Class A roof assemblies include minimum 16 ounce per square foot (0.0416 kg/m 2) copper sheets installed over combustible decks.
- Class A roof assemblies include slate installed over ASTM D226, Type II underlayment over combustible decks.
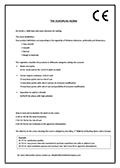
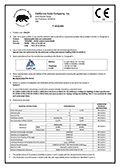
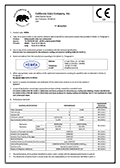
CE Declaration or the “European Norm”
![]() Conformité Européenne
(or European Conformity,
CE) is a marking for products sold within the European Economic Area (EEA). It is a manufacturer’s declaration that the products are in conformity with applicable European directives—for slate roofing material, that directive is
“EN 12326-1: 2004 Slate and stone elements for roofing”
(the “European Norm”). The European Norm classifies slate products using product definition categories: the regularity of thickness tolerance, uniformity, and dimensions; and three different classifying measures: water absorption, risk of rust (called “termic impacts resistance”), and resistance to polluted environments (called “exposition to sulphur’s dioxide”).
Conformité Européenne
(or European Conformity,
CE) is a marking for products sold within the European Economic Area (EEA). It is a manufacturer’s declaration that the products are in conformity with applicable European directives—for slate roofing material, that directive is
“EN 12326-1: 2004 Slate and stone elements for roofing”
(the “European Norm”). The European Norm classifies slate products using product definition categories: the regularity of thickness tolerance, uniformity, and dimensions; and three different classifying measures: water absorption, risk of rust (called “termic impacts resistance”), and resistance to polluted environments (called “exposition to sulphur’s dioxide”).
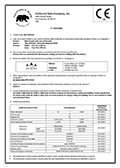
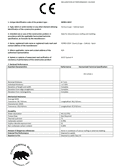
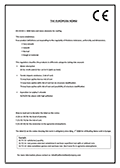
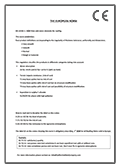
Each crate of slate with the CE marking should contain three grades:
- A (A1 or A2) for the level of porosity.
- T (T1 or T2 or T3) for the risk of rust.
- S (S1 or S2 or S3) for the resistance to the aggressive atmospheres.
Here are some examples of how to decipher the label on the crates:
-
A1–T1–S1
Satisfactory quality
-
A1–T2–S1
Non porous slate but sometimes it can have superficial rust with or without runs.
-
A2–T2–S2
Slate is sometimes porous and can have rust. Don’t ever fix in aggressive atmospheres.
-
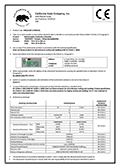
CE Conforming Declaration — Del Castillo Gray Slate
-
-
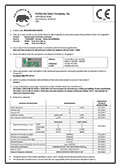
CE Conforming Declaration — Sierra Gray Slate
-
-
CE Conforming Declaration — True Black Galcar Slate
-
-
CE Conforming Declaration — True Black Hebra Slate
-
-
CE Conforming Declaration — Lugo Green Slate
-
-
CE Conforming Declaration — Brazilian Charcoal Slate
-
-
CE Conforming Declaration — Brazilian Gray Green Slate
-
-
CE Conforming Declaration — Brazilian Multi-Color Slate
-


-
Del Castillo Gray Slate
-
Sierra Gray Slate
-
Buckingham Gray Black Slate
-
True Black Galcar Slate
-

True Black Hebra Slate
-
Lugo Green Slate
-
Vermont Strata Gray Slate
-
Gray Green (Semi-Weathering) Slate
-

Brazilian Charcoal Slate
-
Brazilian Gray Green Slate
-
Brazilian Multi-Color Slate
-
Olive Gray Slate
-
Autumn Shades Slate
-
Burgundy Slate